How to Win a Grail Run
Six player-battle wins, four lives, and a river that wants your gold.
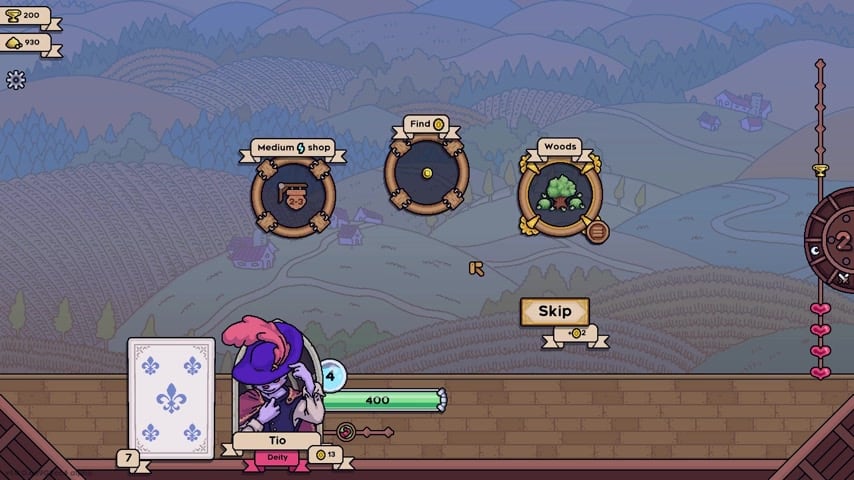
A Grail run is not “kill every monster.” It is “win six player battles before you lose four.” Everything on the river exists to make those six fights possible. This page is routing. For the duel rules see how to play. For pip math see energy and cards. For the scoreboard fights see PvP battles.
The scoreboard
Hearts on the right of the overworld track player-battle progress. Fill six. Empty four and the run is over. Monster nodes can still kill you in a single fight, but they are not the counter. People who treat every side quest as mandatory arrive at the player battle on 80 HP with a deck that is three cards too wide.
Day length is short. Footage shows days with a handful of events and a clock on the right (day 5, day 2, and so on). 1.0 puts a final boss on day 10 with good and bad endings. If you are already at four losses on day 8, you are not “almost there.” You are one snapshot deck away from a reset. Play for the six wins, not for the lore unlock.
Opening days (1–3): survive and name the engine
Take health on the opening bonus if you died last run. Take gold if you already know the shop you want. Take a random trait only if you can slot it into a known combo on the synergy checklist.
Your job on day 1 is to name the engine in six words: “Ratagnan bleed with Toothpick,” “cheese poison shuffle,” “Zappy shock gadgets.” If you cannot name it by the second shop, sell something. Getting started has the first-run shopping list.
Skip side quests that cost health you do not have. Take side quests that pay gold or an attack upgrade when you are already stable. Free common nodes are correct when you are broke and incorrect when you are trying to stay at seven cards.
Mid run (4–7): spend on the engine, not the museum
This is where trophies and gold distract you. Cosmetics chests at 40 trophies do not win player battles. Mabel at 200 trophies can wait until you have a couple of finished runs unless you already bounce off Ratagnan. Spend order is on trophies and cosmetics. See the characters hub.
Blacksmith visits belong here if one card is doing the work. If three cards are doing a little work each, you do not have an engine yet — do not blister a flex card. Upgrades and enchantments is the anvil script.
Trait cap is three. Remove the one that does not name a type you own. Trait tier list exists for greedy passives.
Low energy shops are a recovery node. If the last player battle stalled, that ribbon on the river is more valuable than a rare shop.
Late run (8–10): stop collecting
Every extra card is a pip competitor. Every extra event is a health roll. You should be repeating a cycle you already understand. Iconic cards (Rapier of the Rat, Carrot roast dinner, Johanna’s prosthetic) are build-arounds; if they drop late and do not match the engine, admire them in the cardopedia after the run.
Day 10’s boss is a separate check. Bring a cleanse or over-heal if you have been ignoring status effects. Bring a thin deck so the boss fight actually plays. The dedicated day 10 boss page covers the finale; map and nodes is the river sheet. Good and bad endings are for people who still have player-battle lives left.
Node prices are information
Banners show 0, 2, 4, 8 gold. That is not flavour. An 8-gold shop when you have 9 gold means you skip the next node. Plan two nodes ahead using the run planner. Typical patterns:
- Gold-rich, HP-poor — take heals, skip side quests, accept a cheap shop.
- HP-rich, gold-poor — take free cards or a side quest that pays, skip the 8-gold anvil.
- Both rich — blacksmith, then a trait if you have an empty slot.
- Both poor — skip, take the 0-gold node, sell a card.
Woods-style events (“buy a mushroom, gain a trait that costs 8+, or skip”) are skips unless the trait completes a named combo.
What a winning deck looks like on the HUD
After a winning player battle you should be able to point at:
- A primary status or a primary scaler (Lance counting opponent cards, Guardbot firing on full charge, Toothpick ticking).
- Enough one-pip or two-pip cards that something resolved every cycle.
- A heal or strip that fired at least once if you were bled or poisoned.
- A card count that did not balloon since day 3.
If you won despite none of those, you got a soft snapshot. Do not copy the extra cards you bought “because it was working.” Check the card tier list and starter builds against what actually played.
Loss review in one minute
Ask only four questions:
- Did my cards fill their pips?
- Did I fight the status I thought I was fighting?
- Did I enter the player battle on accident (side quest HP)?
- Was the opponent’s deck thinner?
Then change one thing. Changing four things is how you get a new way to lose. The video on this page is a full demo attempt; watch the map choices more than the damage numbers.
When you can finish six wins on Ratagnan, spend trophies and read Mabel or Zappy before you treat the character tier list as a shopping list. Patch context for day 10 and Iconics is in version 1.0.
Frequently Asked Questions
Quick answers to the most common questions.
How many wins do I need?
Six player-battle wins. Four player-battle losses end the run. Monster fights are resources, not the scoreboard.
When is day 10 important?
Version 1.0 adds a final boss and endings on day 10. Arrive with lives left and a deck that still plays.
Should I take every node?
No. Skip 8-gold shops when you cannot afford the next node. Skip events that do not complete your named engine.
When do I visit the blacksmith?
When one card already plays every cycle and you have leftover gold and health. Do not upgrade a card that never filled.
What should I spend trophies on first?
Mabel at 200 trophies if you want a second kit. Cosmetics can wait.